One of the more common types of analysis conducted in science is the comparison of two groups (e.g., a treatment group and a control group) to identify whether an intervention had a desired effect. The problem, in sport science and other fields, is often a lack of participants (small sample sizes) and an inability to combine prior knowledge (e.g., outcomes from previous research or domain expertise) with the observed data in order to make a broader statement of our findings (IE, a Bayesian approach). Consequently, this leaves us analyzing the data on hand and reporting whatever potential findings shake out.
This tutorial will step through a two group comparison of some simulated data from both a frequentist (t-test) and Bayesian approach.
All code is accessible on my GITHUB page.
Two Groups – Simulated Data
We are conducting a study on the effect of a new strength training program. Participants are randomly allocated into a control group (n = 17), receiving a normal training program, or an experimental group (n = 22), receiving the new training program.
The data consists of the change in strength score observed for each participant in their respective groups. (NOTE: For the purposes of this example, the strength score is a made up number describing a participants strength).
Simulate the data
library(tidyverse)
library(patchwork)

theme_set(theme_classic())

set.seed(6677)
df <- data.frame( subject = 1:39, group = c(rep("control", times = 17), rep("experimental", times = 22)), strength_score_change = c(round(rnorm(n = 17, mean = 0, sd = 0.5), 1), round(rnorm(n = 22, mean = 0.5, sd = 0.5), 1)) ) %>%
  mutate(group = factor(group, levels = c("experimental", "control")))
Summary Statistics
df %>%
  group_by(group) %>%
  summarize(N = n(),
            Avg = mean(strength_score_change),
            SD = sd(strength_score_change),
            SE = SD / sqrt(N))
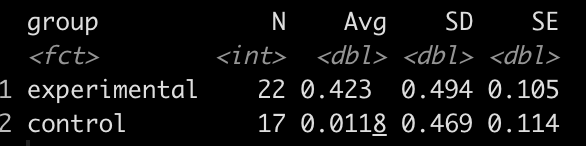
It looks like the new strength training program led to a greater improvement in strength, on average, than the normal strength training program.
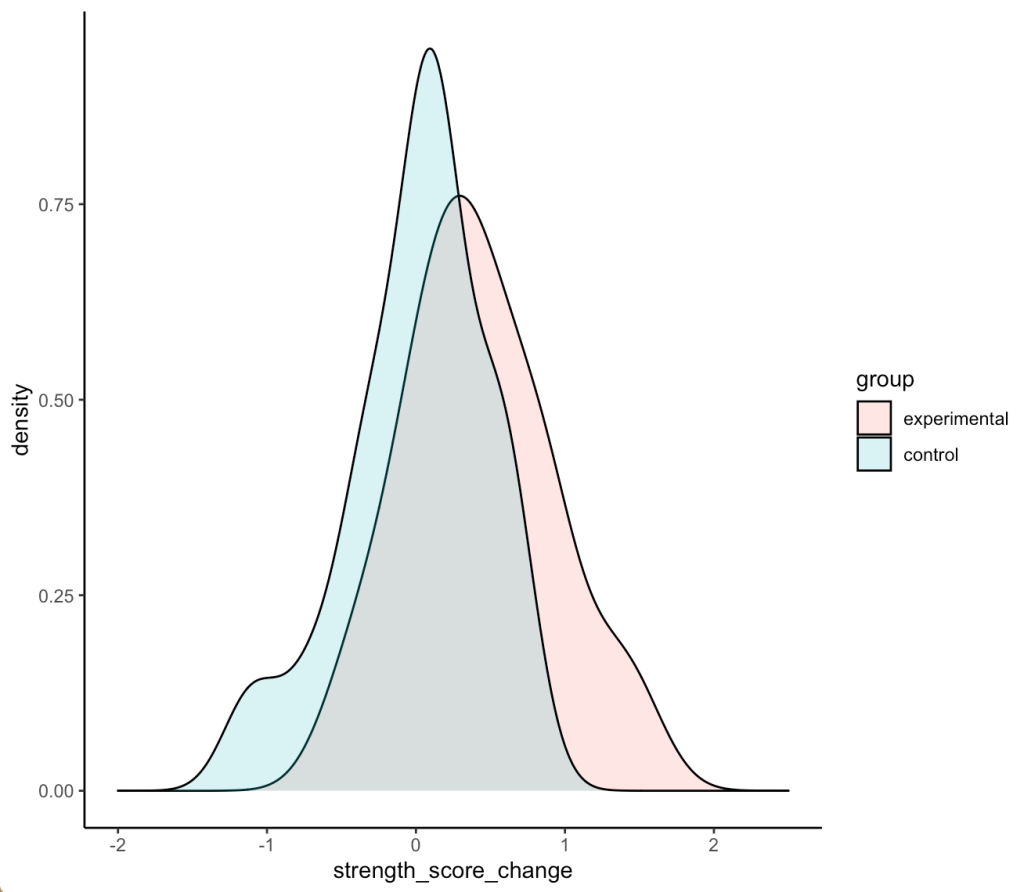
Plot the data
Density plots of the two distributions
df %>%
  ggplot(aes(x = strength_score_change, fill = group)) +
  geom_density(alpha = 0.2) +
  xlim(-2, 2.5)
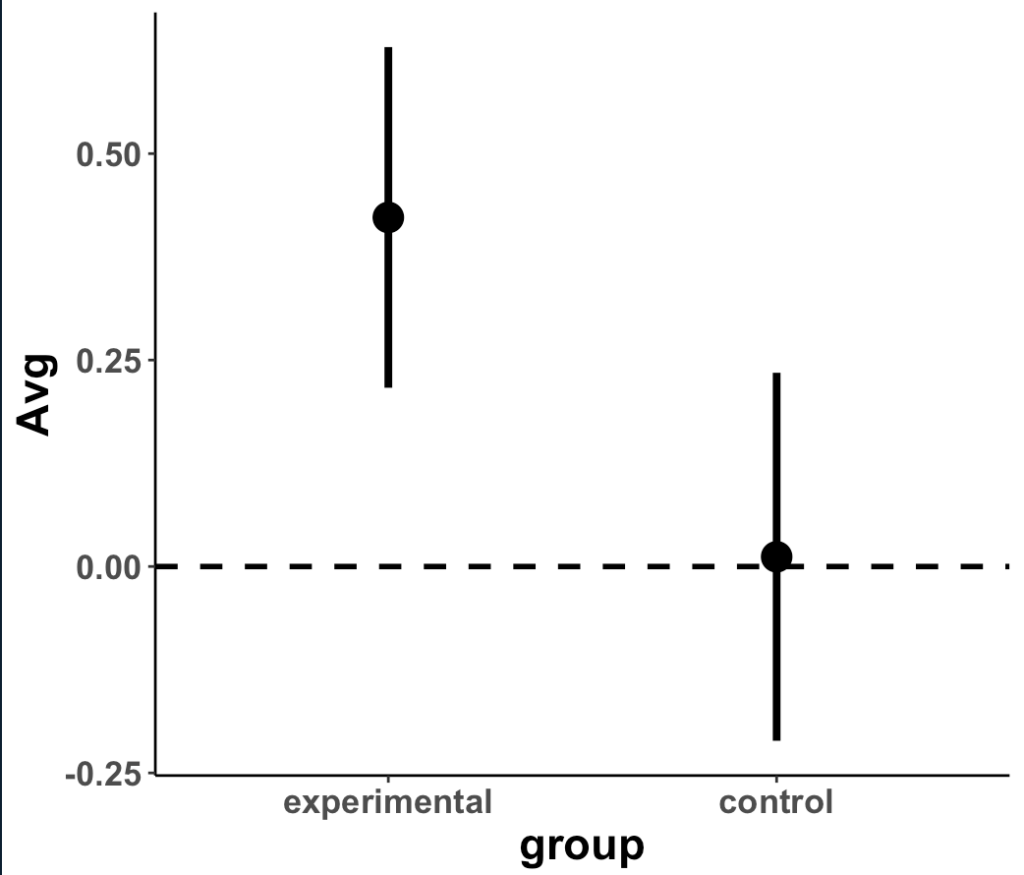
Plot the means and 95% CI to compare visually
df %>%
  group_by(group) %>%
  summarize(N = n(),
            Avg = mean(strength_score_change),
            SD = sd(strength_score_change),
            SE = SD / sqrt(N)) %>%
  ggplot(aes(x = group, y = Avg)) +
  geom_hline(yintercept = 0,
             size = 1,
             linetype = "dashed") +
  geom_point(size = 5) +
  geom_errorbar(aes(ymin = Avg - 1.96 * SE, ymax = Avg + 1.96 * SE),
                width = 0,
                size = 1.4) +
  theme(axis.text = element_text(face = "bold", size = 13),
        axis.title = element_text(face = "bold", size = 17))
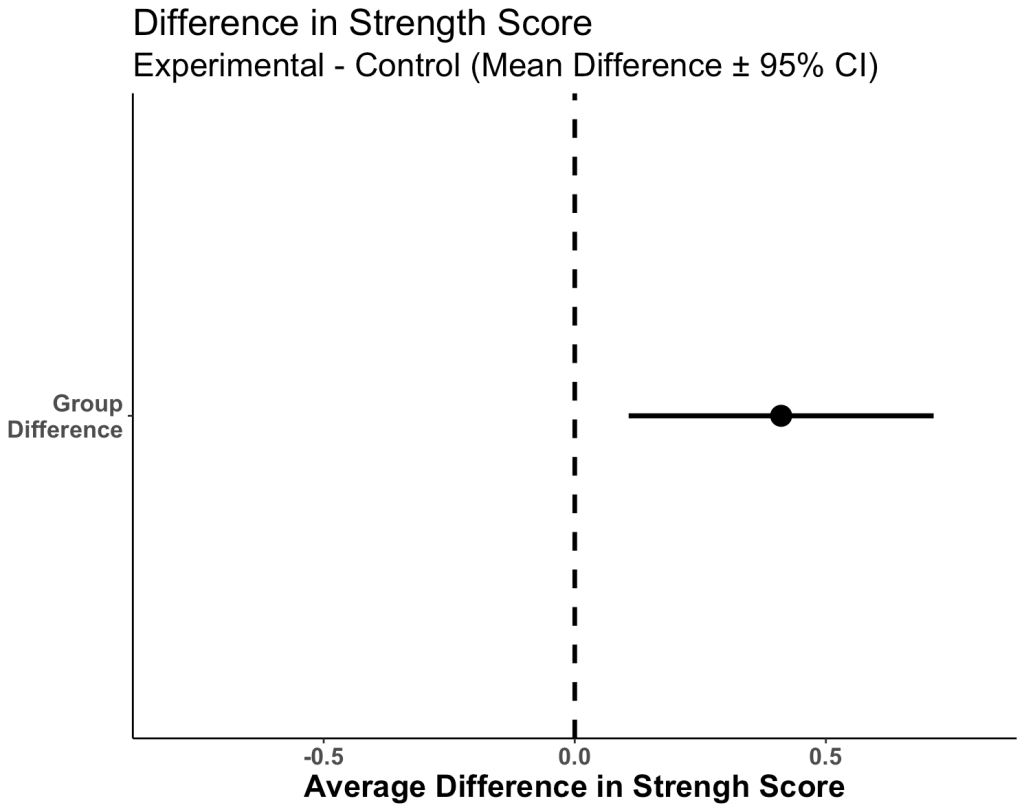
Plot the 95% CI for the difference in means
df %>%
mutate(group = factor(group, levels = c("control", "experimental"))) %>%
group_by(group) %>%
summarize(N = n(),
Avg = mean(strength_score_change),
SD = sd(strength_score_change),
SE = SD / sqrt(N),
SE2 = SE^2,
.groups = "drop") %&gt;%
summarize(diff = diff(Avg),
se_diff = sqrt(sum(SE2))) %&gt;%
mutate(group = 'Group\nDifference') %&gt;%
ggplot(aes(x = diff, y = 'Group\nDifference')) +
geom_vline(aes(xintercept = 0),
linetype = "dashed",
size = 1.2) +
geom_point(size = 5) +
geom_errorbar(aes(xmin = diff - 1.96 * se_diff,
xmax = diff + 1.96 * se_diff),
width = 0,
size = 1.3) +
xlim(-0.8, 0.8) +
labs(y = NULL,
x = "Average Difference in Strengh Score",
title = "Difference in Strength Score",
subtitle = "Experimental - Control (Mean Difference ± 95% CI)") +
theme(axis.text = element_text(face = "bold", size = 13),
axis.title = element_text(face = "bold", size = 17),
plot.title = element_text(size = 20),
plot.subtitle = element_text(size = 18))
Initial Observations
- We can see that the two distributions have a decent amount of overlap
- The mean change in strength for the experimental group appears to be larger than the mean change in strength for the control group
- When visually comparing the group means and their associated confidence intervals, there is an observable difference. Additionally, looking at the mean difference plot, that difference appears to be significant based on the fact that the confidence interval does not cross zero.
So, it seems like something is going on here with the new strength training program. Let’s do some testing to see just how large the difference is between our two groups.
Group Comparison: T-test
First, let’s use a frequentist approach to evaluating the difference in strength score change between the two groups. We will use a t-test to compare the mean differences.
diff_t_test <- t.test(strength_score_change ~ group,
       data = df,
       alternative = "two.sided")

## store some of the main values in their own elements to use later
t_test_diff  <- as.vector(round(diff_t_test$estimate[1] - diff_t_test$estimate[2], 2))

se_diff <- 0.155    # calculated above when creating the plot

diff_t_test
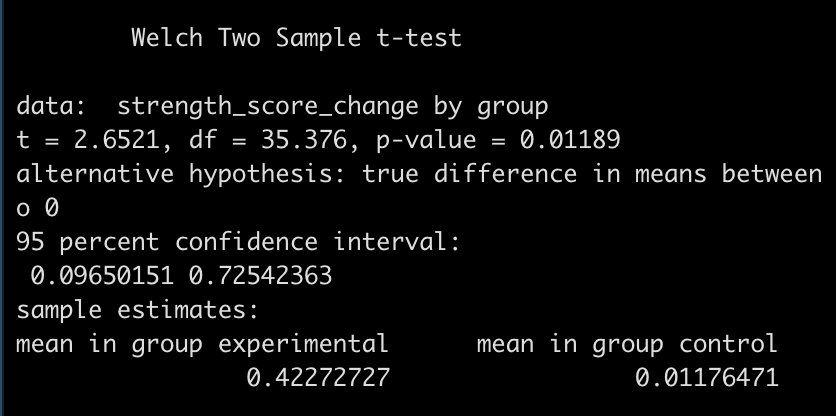
- The test is statistically significant, as the p-value is less than the magic 0.05 (p = 0.01) with a mean difference in strength score of 0.41 and a 95% Confidence Interval of 0.1 to 0.73.
Here, the null hypothesis was that the difference in strength improvement between the two groups is 0 (no difference) while the alternative hypothesis is that the difference is not 0. In this case, we did a two sided test so we are stating that we want to know if the change in strength from the new training program is either better or worse than the normal training program. If we were interested in testing the difference in a specific direction, we could have done a one sided test in the direction of our hypothesis, for example, testing whether the new training program is better than the normal program.
But, what if we just got lucky with our sample in the experimental group, and they happened to respond really well to the new program, and got unlucky in our control group, and they happened to not change as much to the normal training program? This could certainly happen. Also, had we collected data on a few more participants, it is possible that the group means could have changed and no effect was observed.
The t-test only allows us to compare the group means. It doesn’t tell us anything about the differences in variances between groups (we could do an F-test for that). The other issue is that rarely is the difference between two groups exactly 0. It makes more sense for us to compare a full distribution of the data and make an inference about how much difference there is between the two groups. Finally, we are only dealing with the data we have on hand (the data collected for our study). What if we want to incorporate prior information/knowledge into the analysis? What if we collect data on a few more participants and want to add that to what we have already observed to see how it changes the distribution of our data? For that, we can use a Bayesian approach.
Group Comparison: Bayes
The two approaches we will use are:
- Group comparison with a known variance, using conjugate priors
- Group comparisons without a know variance, estimating the mean and SD distributions jointly
Part 1: Group Comparison with known variance
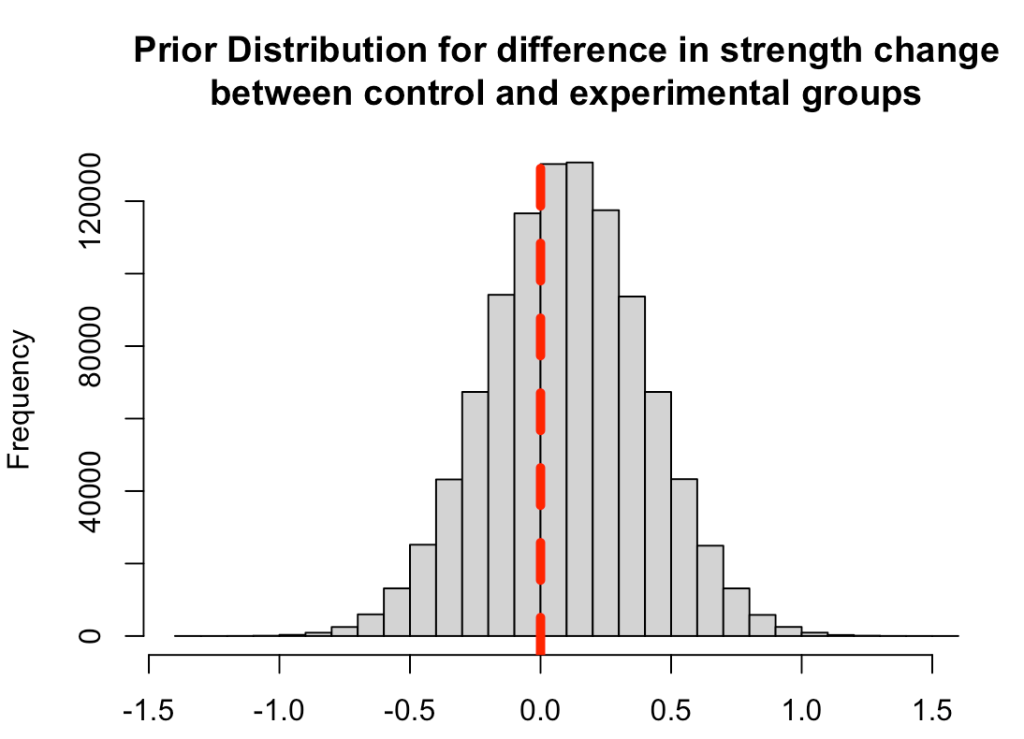
First, we need to set some priors. Let’s say that we are skeptical about the effect of the new strength training program. It is a new training stimulus that the subjects have never been exposed to, so perhaps we believe that it will improve strength but not much more than the traditional program. We will set our prior belief about the mean improvement of any strength training program to be 0.1 with a standard deviation of 0.3, for our population. Thus, we will look to combine this average/expected improvement (prior knowledge) with the observations in improvement that we see in our respective groups. Finally, we convert the standard deviation of the mean to precision, calculated as 1/sd^2, for our equations going forward.
prior_mu <- 0.1
prior_sd <- 0.3
prior_var <- prior_sd^2
prior_precision <- 1 / prior_var
Plot the prior distribution for the mean difference
hist(rnorm(n = 1e6, mean = prior_mu, sd = prior_sd),
     main = "Prior Distribution for difference in strength change\nbetween control and experimental groups",
     xlab = NULL)
abline(v = 0,
       col = "red",
       lwd = 5,
       lty = 2)
Next, to make this conjugate approach work we need to have a known standard deviation. In this example, we will not be estimating the joint posterior distributions (mean and SD). Rather, we are saying that we are interested in knowing the mean and the variability around it but we are going to have a fixed/known SD.
Let’s say we looked at some previously published scientific literature and also tried out the new program in a small pilot study of athletes and we the improvements of a strength training program are normally distributed with a known SD of 0.6.
known_sd <- 0.6
known_var <- known_sd^2
Finally, let’s store the summary statistics for each group in their own elements. We can type these directly in from our summary table.
df %>%
  group_by(group) %>%
  summarize(N = n(),
            Avg = mean(strength_score_change),
            SD = sd(strength_score_change),
            SE = SD / sqrt(N))

experimental_N <- 22
experimental_mu <- 0.423
experimental_sd <- 0.494
experimental_var <- experimental_sd^2
experimental_precision <- 1 / experimental_var

control_N <- 17
control_mu <- 0.0118
control_sd <- 0.469
control_var <- control_sd^2
control_precision <- 1 / control_var
Now we are ready to update the observed study data for each group with our prior information and obtain posterior estimates. We will use the updating rules provided by William Bolstad in Chapter 13 of his book, Introduction to Bayesian Statistics, 2nd Ed.
##### Update the control group observations ######
## SD
posterior_precision_control <- prior_precision + control_N / known_var
posterior_var_control <- 1 / posterior_precision_control
posterior_sd_control <- sqrt(posterior_var_control)

## mean
posterior_mu_control <- prior_precision / posterior_precision_control * prior_mu + (control_N / known_var) / posterior_precision_control * control_mu

posterior_mu_control
posterior_sd_control

##### Update the experimental group observations ######
## SD
posterior_precision_experimental <- prior_precision + experimental_N / known_var
posterior_var_experimental <- 1 / posterior_precision_experimental
posterior_sd_experimental <- sqrt(posterior_var_experimental)

## mean
posterior_mu_experimental <- prior_precision / posterior_precision_experimental * prior_mu + (experimental_N / known_var) / posterior_precision_experimental * experimental_mu

posterior_mu_experimental
posterior_sd_experimental
Compare the posterior difference in strength change
# mean
mu_diff <- posterior_mu_experimental - posterior_mu_control
mu_diff

# sd = sqrt(var1 + var2)
sd_diff <- sqrt(posterior_var_experimental + posterior_var_control)
sd_diff

# 95% Credible Interval
mu_diff + qnorm(p = c(0.025, 0.975)) * sd_diff

- Combining the observations for each group with our prior, it appears that the new program was more effective than the normal program on average (0.34 difference in change score between experimental and control) but the credible interval suggests the data is consistent with the new program having no extra benefit [95% Credible Interval: -0.0003 to 0.69].
Next, we can take the posterior parameters and perform a Monte Carlo Simulation to compare the posterior distributions.
Monte Carlo Simulation is an approach that uses random sampling from a defined distribution to solve a problem. Here, we will use Monte Carlo Simulation to sample from the normal distributions of the control and experimental groups as well as a simulation for the difference between the two. To do this, we will create a random draw of 10,000 values with the mean and standard deviation being defined as the posterior mean and standard deviation from the respective groups.
## Number of simulations
N <- 10000

## Monte Carlo Simulation
set.seed(9191)
control_posterior <- rnorm(n = N, mean = posterior_mu_control, sd = posterior_sd_control)
experimental_posterior <- rnorm(n = N, mean = posterior_mu_experimental, sd = posterior_sd_experimental)
diff_posterior <- rnorm(n = N, mean = mu_diff, sd = sd_diff)

## Put the control and experimental groups into a data frame
posterior_df <- data.frame(
  group = c(rep("control", times = N), rep("experimental", times = N)),
  posterior_sim = c(control_posterior, experimental_posterior)
)
Plot the mean and 95% CI for both simulated groups
posterior_df %>%
  group_by(group) %>%
  summarize(Avg = mean(posterior_sim),
            SE = sd(posterior_sim)) %>%
  ggplot(aes(x = group, y = Avg)) +
  geom_hline(yintercept = 0,
             size = 1,
             linetype = "dashed") +
  geom_point(size = 5) +
  geom_errorbar(aes(ymin = Avg - 1.96 * SE, ymax = Avg + 1.96 * SE),
                width = 0,
                size = 1.4) +
  labs(x = NULL,
       y = "Mean Diff",
       title = "Difference in Strength Score",
       subtitle = "Monte Carlo Simulation of Posterior Mean and SD") +
  theme(axis.text = element_text(face = "bold", size = 13),
        axis.title = element_text(face = "bold", size = 17),
        plot.title = element_text(size = 20),
        plot.subtitle = element_text(size = 17))
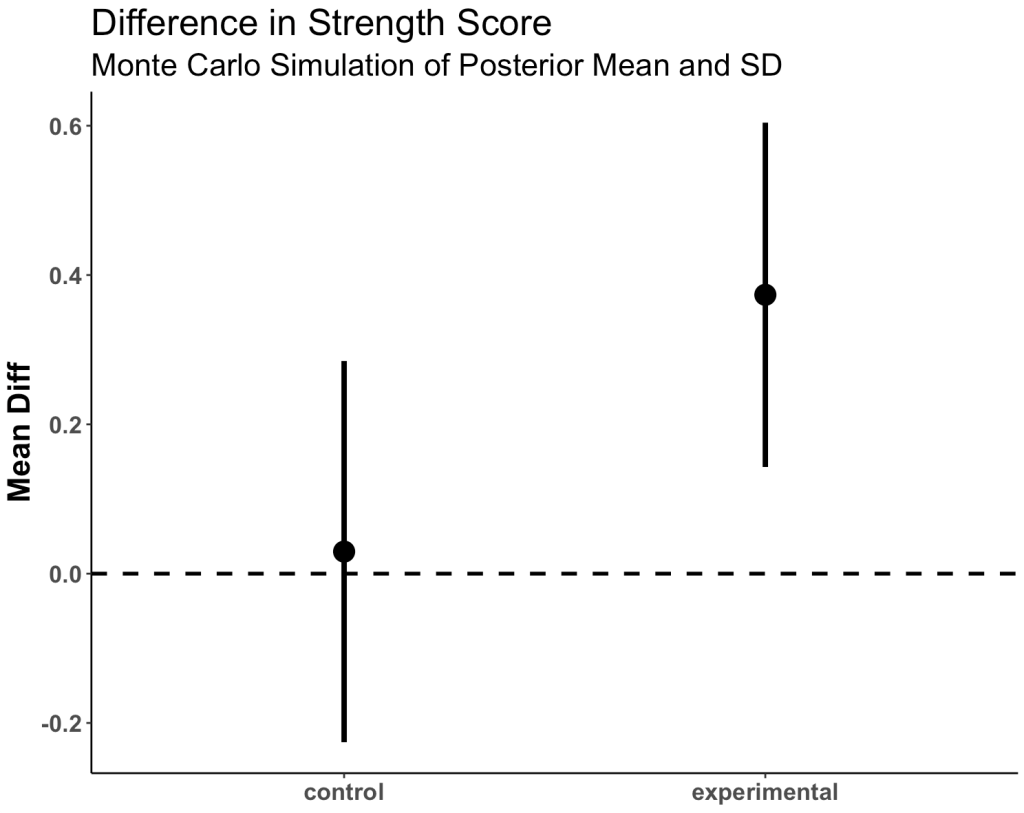
- We see more overlap here than we did when we were just looking at the observed data. Part of this is due to the priors that we set.
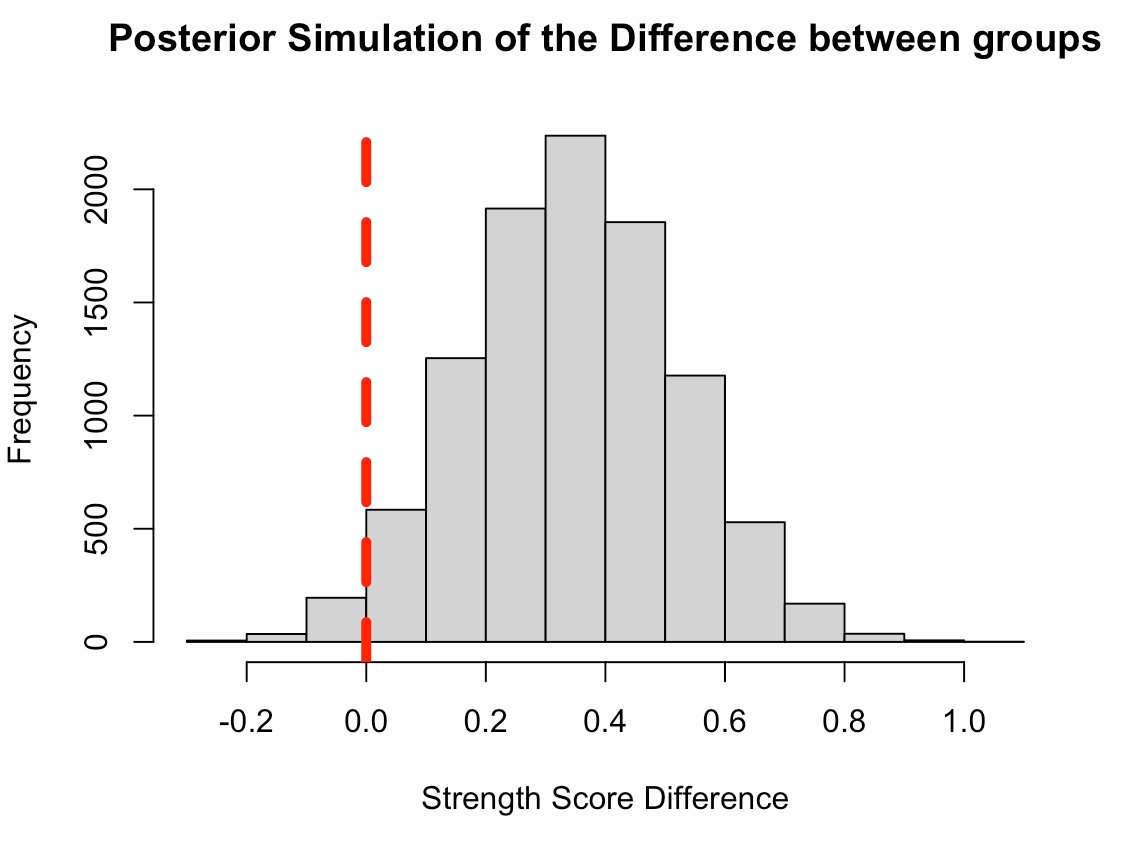
Plot the posterior simulation for the difference
hist(diff_posterior,
     main = "Posterior Simulation of the Difference between groups",
     xlab = "Strength Score Difference")
abline(v = 0,
       col = "red",
       lwd = 5,
       lty = 2)

Compare these results to the observed data and the t-test results
data.frame(
  group = c("control", "experimental", "difference"),
  observed_avg = c(control_mu, experimental_mu, t_test_diff),
  posterior_sim_avg = c(posterior_mu_control, posterior_mu_experimental, mu_diff),
  observed_standard_error = c(control_sd / sqrt(control_N), experimental_sd / sqrt(experimental_N), se_diff),
  posterior_sim_standard_error = c(posterior_sd_control, posterior_sd_experimental, sd_diff)
  )

- Recall that we set out prior mean to 0.1 and our prior SD to 0.3
- Also notice that, because this conjugate approach is directed at the means, I convert the observed standard deviations into standard errors (the standard deviation of the mean given the sample size). Remember, we set the SD to be known for this approach to work, so we are not able to say anything about it following our Bayesian procedure. To do so, we’d need to estimate both parameters (mean and SD) jointly. We will do this in part 2.
- Above, we see that, following the Bayesian approach, the mean value of the control group gets pulled up closer to our prior while the mean value of the experimental group gets pulled down closer to that prior.
- The posterior for the difference between the two groups, which is what we are interested in, has come down towards the prior, considerably. Had we had a larger sample of data in our two groups, the movement towards the prior would have been less extreme. But, since this was a relatively small study we get more movement towards the prior, placing less confidence in the observed sample of participants we had. We also see that the standard error around the mean difference increased, since our prior SD was 0.3. So, the mean difference decreased a bit and the standard error around that mean increased a bit. Both occurrences lead to less certainty in our observed outcomes.
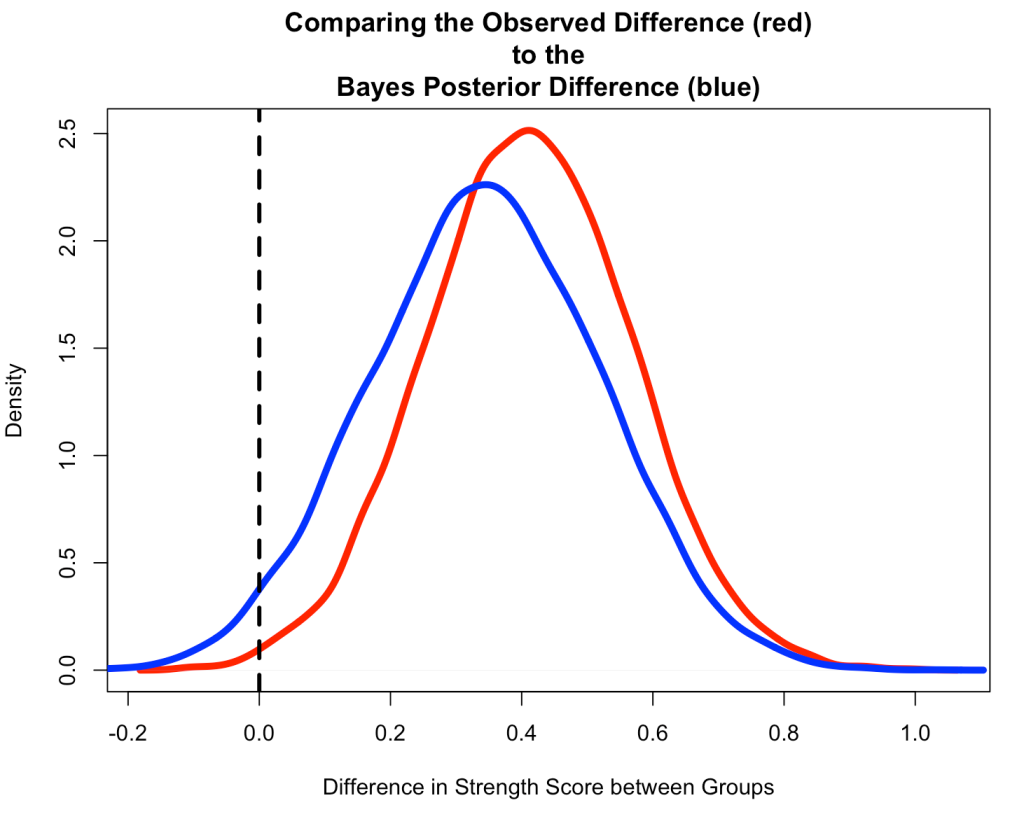
Compare the Observed Difference to the Bayesian Posterior Difference
- Start by creating a Monte Carlo Simulation of the observed difference from the original data.
- Notice that the Bayesian Posterior Difference (blue) is pulled down towards our prior, slightly.
- We also see that the Bayesian Posterior has more overlap of 0 than the Observed Difference (red) from the original data, which had a small sample size and hadn’t combined any prior knowledge that we might have had.
N <- 10000

set.seed(8945)
observed_diff <- rnorm(n = N, mean = t_test_diff, sd = se_diff)

plot(density(observed_diff),
     lwd = 5,
     col = "red",
     main = "Comparing the Observed Difference (red)\nto the\nBayes Posterior Difference (blue)",
     xlab = "Difference in Strength Score between Groups")
lines(density(diff_posterior),
      lwd = 5,
      col = "blue")
abline(v = 0,
       lty = 2,
       lwd = 3,
       col = "black")
Wrapping Up
That’s it for part 1. We’ve computed a frequentist t-test of the observed data in our study and compared those results to Bayesian estimation where we combined the observed data with some prior knowledge that we accessed from previous research and domain expertise. In this example, we used a conjugate approach and therefore were required to specify a known standard deviation for the data. Unfortunately, this may not always make sense to do and we may instead need to jointly estimating both the mean and standard deviation simultaneously. In part 2, we will discuss how to do this.
The code for this article is accessible on my GITHUB page.
If you see any code or mathematical errors, please email me.